Monday, September 26, 2011

Pistachio & Honey Ice Cream


Pistachios. My newly discovered colorful love. Eaten by the handful, roasted in the oven, and even better, made into an ice cream that is subtly sweet and savory at the same time.
This stuff is dy-na-mite. Notice, it's not that fake green color. It doesn't have a trace of pseudo-nut flavor. This is the real deal, a pistachio ice cream in which the pistachio shines.Try not to eat it all at once, I dare you.


{Pistachio & Honey Ice Cream}
Ingredients:

3/4 cup pistachios, shelled
2/3 cup sugar
2/3 cup brown sugar
1-1/2 cup whole milk
1-1/2 cup heavy cream
2 TB honey
2 tsp vanilla extract
1/2 tsp almond extract
2 eggs, or equivalent egg beaters
pinch of salt

Directions:

Preheat the oven to 350 degrees. After shelling the pistachios, place on a baking sheet and roast for about 10 to 12 minutes. Cool, then pulverize them in a food processor into tiny pieces.

Combine all ingredients except pistachios with a hand mixer. Then stir in pistachios. Chill in the refrigerator then make according to your ice cream freezer instructions. Store in an airtight container and cover with wax paper to prevent freezer burn. Freeze in the coldest part of your freezer for at least four hours.


And since my freezer is currently bursting with too many ice creams, so that every time anyone opens it they risk a broken toe if they don't dodge the cascade of containers that inevitably crash down, I take it upon myself to eat this ice cream quickly. Single-handedly. And probably in one sitting.

Friday, September 23, 2011

Spicy Pulled Pork


I went out of my comfort zone today. I cooked. Not baked, or even grilled. I Cooked, and it was something that required more effort than dousing it in some olive oil and throwing it on a pan. I brined, rubbed, roasted, shredded and assembled, over the course of 20 plus hours. With a meat thermometer. And only one meltdown.
I'm quite proud of myself.

Because baking is easy. You just follow directions, maybe tweak one or two details, throw a pan full of sweets into the oven and the result is almost always delicious. But with cooking, there are so many steps. So many places to go wrong. And you have to actually touch raw meat. Shiver.

So, I tried this elaborate recipe. And lo and behold, it worked! Moral of the story: cook more. Next I'll tackle roasting a chicken, maybe boning a duck. Julia Child, watch out.


{Spicy Pulled Pork} Adapted from Kate Coghlan and Kevin & Amanda

What you'll need:
1 large Boston Butt (bone in, layer of fat on top)- mine was 7 pounds
Large roasting pan (should be at least an inch or more space around the pork and 3 inch sides)
Meat thermometer
Large container, for brining

Dry rub and brine
Favorite BBQ sauce (my recipe here)
Cabbage slaw

Dry Rub
1 Tbsp ground cumin
1 Tbsp garlic powder
1 Tbsp onion powder
1 Tbsp salt
1 Tbsp ground pepper
1 Tbsp paprika
1/2 Tbsp chili powder
1/2 Tbsp cayenne pepper
1/2 Tbsp ground red pepper
1/2 cup brown sugar

Mix well. Store in airtight container.

Brine
1/2 cup salt
1/2 cup brown sugar
2 quarts cold water
3 Tbsp dry rub mix
2 bay leaves

Combine salt and cold water and stir until salt is completely dissolved.
Stir in the brown sugar and dry rub.


Preparation:


Rinse the Boston Butt (I just love calling it that) and place in a large container, pour in the brine solution until the shoulder is completely covered. By the way, the brine softens the meat while moisturizing the meat for a long cooking process. Cover the container and place in the refrigerator for at least 8 hours, overnight works perfectly. Then, in the morning, remove the Butt from the brine, pat dry with paper towels, place in a baking pan and sprinkle dry rub onto the surface of the Butt and massage in so it coats every surface on all sides. Make sure the fat layer on the shoulder is facing up before cooking! Place baking pan uncovered in a 225 degree oven on the middle rack. Insert a meat thermometer into the center or thickest part of the shoulder, but not touching the bone. Monitor the temperature throughout cooking. Don't take it out until the center temperature reaches 200 degrees. When the Butt has reached 200 degrees, turn off the oven and let the roast cool for a couple of hours before removing from the oven. If the bottom of the pan is dry (or crusted with dried spices) then cover the pan with foil to retain internal moisture of the meat during the cooling period. When the temperature drops to 170 degrees or slightly lower, remove from oven. Place on a large cutting board, and remove the large sheet of crusted fat on the top and pull the meat apart with two forks.


Now for the fun part. Pile the meat high on some awesome buns, then douse in my Sweet BBQ sauce and top with purple cabbage slaw (recipe to follow). Then dig in! Be prepared for dripping fingers, burning lips and a saucy face. These pulled pork sandwiches have a lovely kick to them. Enjoy!


  {Red Cabbage Slaw}


I hate mayo. Detest it. But these sandwiches scream for the crunch of slaw. Pretty, tasty slaw too.

Simply throw together 1/4 cup olive oil, 1/2 cup cider vinegar, 1/2 tsp salt, 1/2 tsp pepper, 2 tsp sugar, 1/4 small onion, 1 TB mustard and a head of shredded red cabbage. Stir and store in the refrigerator.


So here goes: 

Bun. 
Spicy pulled pork.
Sweet BBQ sauce
Slaw
Bun. 

Now chow down, with plenty of napkins and water handy. You'll notice I have no photos of the actual assembled sandwiches. That's because after smelling the awesome aroma of slow-roasting pork for half the day, we ate them all before I had a chance to grab my camera!

Wednesday, September 21, 2011

Sweet Barbecue Sauce

This is so good, it shouldn't even be called a condiment. This barbecue sauce is an entity all its own. This sweet, slightly tangy BBQ knocks the socks off anything on the shelves and puts that wow factor into any dish. Pour generously over anything edible. 


{Sweet Barbecue Sauce}
Ingredients
1/2 large onion, finely diced
1-1/2 cup ketchup
1/8 cup vinegar
1/8 cup lemon juice
1/2 cup brown sugar
1 Tbsp Siracha hot sauce
1/8 cup Worcestershire Sauce
1 stick butter
1/2 Tbsp salt
1/4 tsp. garlic salt
1/4 Tbsp chili powder


In a skillet with butter, cook onion till soft. Add ketchup and other ingredients and simmer for about 15 minutes. Remove from heat and sample a masterpiece. Once taste and you'll be hooked.


Friday, September 16, 2011

Oatmeal Honey Vanilla Bean Ice Cream


It's been more than a week since I've made ice cream and my poor ice cream maker is starting to feel neglected. It's been spoiled from overuse, since for awhile there I was making (and finishing) quarts of ice cream everyday. Well, my freezer is officially empty of the good stuff so it's officially time to make more.

Plus I got some vanilla beans calling my name.


{OATMEAL HONEY VANILLA BEAN ICE CREAM with black raspberries}
Adapted from Jeni's Splendid Ice Cream Brambleberry Crisp
Ingredients
2 cups whole milk
1 TB plus 1 tsp cornstarch
1-1/2 ounces cream cheese, softened
1/8 tsp fine sea salt
1-1/4 cups heavy cream
1/3 cup white sugar
1/3 cup brown sugar
1 TB honey
2 TB light corn syrup
1 vanilla bean, split and scraped out, seeds and bean reserved.

Directions
Mix abut 2 TB of the milk with the cornstarch in a small bowl to make a smooth slurry. Whisk the cream cheese and salt in a bowl until smooth.

Cooke the milk, cream, sugar, corn syrup, honey and vanilla seeds and been in a 4-quart saucepan, bring to rolling boil over medium-high heat, and boil (she says 4 minutes, I do 3). Remove from heat and gradually whisk in the cornstarch mixture. Bring it all back to a boil and cook, stirring, about 1 minute. Remove from heat.

Whisk the hot milk mixture into the cream cheese. Chill. Then remove the vanilla bean. Then freeze in the ice cream cooler.
Meanwhile, make the...


{STREUSEL}
Ingredients
Makes about 3 cups
2 sticks unsalted butter, cut into 1/2 inch cubes and chilled
1-1/2 cups flour
1/8 tsp cinnamon
3/4 cup packed brown sugar
1/2 tsp salt
1-1/2 cup old fashioned oats

Directions
Preheat the oven to 350 degrees. Put all ingredients except the oats in a bowl and blend. Work quickly so the butter doesn't melt. Add oats and mix well. Spread out on an ungreased backing sheet. Break up any large clumps.

Bake for 20-25 minutes, until toasted and browned, stirring occasionally. Let cool completely, then cool until ready to use.


Layer the honey vanilla bean ice cream with generous portions of streusel and raspberries (or any fruit) to make this an oatmeal crisp ice cream. Store in an airtight container and cover with wax or parchment paper to avoid freezer burn.

This ice cream is amazing! Since making this ice cream, I've been walking around hugging this most splendid cookbook. More ice cream to come soon, surely.


Monday, September 12, 2011

Cookie Dough Balls


I ran 9 miles today. Which means, I believe, that I am entitled to at least 9 cookies. After I made this decision (about 3 miles into said run), I spent the rest of the miles deciding which cookie would be the best treat. Instead of running after the proverbial carrot, my motivation was most certainly a cookie.


And not just any cookie. To ensure continued running, I needed to take my favorite cookie and really up the ante. Only something gooey and oozing with chocolate would do. So what's better than chocolate chip cookies? Chocolate chip cookie dough. A safe version, of course, that only tastes like the raw stuff.

Chocolate Chip Cookie Dough Balls adapted from My life as a Mrs.
Makes about 15 cookies
{Ingredients}
1/2 cup crisco
1/2 cup brown sugar
1/4 cup sugar
1 egg
1 tsp. vanilla extract
2 cups flour
1/2 tsp. baking powder
1/2 tsp. salt
1 cup semi-sweet chocolate chips

{Directions}
Preheat oven to 350 degrees. Cream the butter and sugars together. Add in the egg and vanilla. Stir in dry ingredients. Last, fold in the chocolate chips. The dough will be slightly flaky and dry, which is perfect. Scoop into balls about 1-1/2 inches in diameter. I used my hands to form them into round balls. Place on a baking sheet. They should all fit on one, these dough balls do not spread out like normal cookies. Bake for 8-10 minutes, until they reach 160 degrees F (the temperature recommended as safe by the USDA- good to know). Use a candy thermometer to check.


DON'T OVERCOOK! These are dough balls, not cookies. They need to be gooey.

Daisy was a big fan too.
They come out perfectly round, like little pockets of doughy happiness. I say its okay to eat more than one, since they're so deceivingly dainty and eatable.


These are super fat, super gooey and literally perfection in bite-sized cookie form. Armed with a fork and several napkins, I like to eat these right out of the oven. Nom nom. Welcome to my new favorite recipe.


Wednesday, September 7, 2011

Chocolate Chip Cherry Scones


I'm having another one of my food fads. You know, one week it was cupcakes. The next it was peanut butter cookies, and of course, ice cream took over there for awhile and the love affair with my new cuisinart ice cream freezer still hasn't cooled off (pumpkin ice cream anyone?). But this week, there is something new, something unexpected, something I didn't even know I like so much, let alone love.

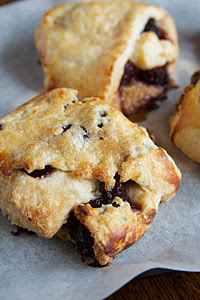
Their version. I strive to replicate.
Isn't that how the best relationships get started?

This week, scones have stolen my heart and robbed me of my self-control.

I blame Spoon Market, that shop right next to my workplace. Even though I only work there once or twice a week, somehow I manage to scarf down 4 or 5 scones. You do the math. I'm beginning to think that those sprinkles of raw sugar sparkling atop each pastry is really some sort of addictive drug. Maybe cocaine. They are truly habit forming. And that good. As evidenced by my nonstop trips to their bakery counter, the crumbs all over my car and the lack of cash in my empty wallet.

And since I'm starting to be embarrassed by the knowing looks of the market workers who begin reaching for the scones even before I ask for one, it's time to make my own buttery flaky sugary chocolatey tart unbelievable scones.


Chocolate Chip Cherry Scones (makes 6)
Ingredients:
1 egg
2/3 cup heavy cream
2 cups all-purpose or pastry flour
2 tablespoons sugar
1 tablespoon baking powder
1/4 teaspoon salt
5 tablespoons unsalted butter, cut into small pieces and chilled
1 cup dried cherries
1 cup bittersweet chocolate chips
Sugar in the raw, for garnish


Directions:
Preheat oven 400 degrees and line a baking sheet with wax or parchment paper.
In a small bowl, stir the egg and cream together. Whisk the flour, sugar, baking powder and salt together in a large bowl. Drop in the butter and, using your fingers, toss to coat the pieces of butter  with the flour. Quickly, working  with your fingertips or a pastry blender, cut and rub the butter into the dry ingredients. The butter will be in small chunks of all different sizes.
 
Pour the wet ingredients over the dry ingredients and stir with a fork. Don't overdo it or the scones will be flat, not fluffy. Next, knead the dough a few times until it is slightly springy.
Lightly dust a counter with flour. Take about a third of the dough and press in onto the counter and pat it into a rough square. You're going to make a layered scone: place some dried cherries and chopped chocolate chips onto a third of the dough. Roll the dough over it, and continue the process on the next layer. Fold it over again, cut it in half and sprinkle sugar over the top.
 
Now, the scones can either be frozen for later use. When you go to bake them, don't defrost, just bake them for 2 extra minutes. For instant gratification, bake the scones for 15 minutes, or until their tops are golden. 


Spoon, watch out. These scones rock my socks. Good thing they only make six...

Thursday, September 1, 2011

Homemade Tomato Sauce


What makes every dish better? Besides goat cheese. And sugar. Tomato sauce, that's what. Especially if it is homemade. This gets used year-round, and we'd be lost without it. How else would we make chili, spaghetti, vegetable soup, stuffed peppers and anything else that requires a red sauce. The store bought just can't measure up.


This is my great grandmother's secret recipe, passed down through the generations to my mom, and now me. Okay, so it's actually really simple but it does take considerable time and effort to turn out this amazing sauce.You'll need a Victoria Strainer, which works by mashing the tomatoes and pushing the tomatoes through a sieve.

For some reason, it also tastes better knowing that the tomatoes, peppers, onions and herbs that go into this sauce all came from your very own garden. That's pride, and in the winter, it reminds you that summer will be here eventually.

Ingredients:
1/2 bushel tomatoes
2-3 chopped onions and peppers
1/2 tsp. red pepper
1/3 cup oil
1 tsp basil
1 tsp oregano
1 tsp salt
1 tsp garlic salt
1/4 to 1/2 cup sugar
2 cans of tomato paste (15 oz.)

Directions:
First, soak your tomatoes in a clean sink full of cold water.


beautiful, huge tomatoes
 Next, halve or quarter the tomatoes until they are about 2 inch chunks. Then put into a Victoria Strainer, basically a very convenient tool that mashes the tomato through a sieve, separating the juice from the rest of the tomato a lot faster than I could do it.


Then mash all the tomatoes through the strainer. This takes a lot of muscle, so it's best to work in shifts. The strainer will separate the tomato juice from the seeds, skin and other waste. 

lots of cranking goes into this sauce. Secret ingredient: muscle

hello, juice.

Next, pour the tomato juice into your biggest pot. Simmer for 1 hour, stirring occasionally. After an hour, add the chopped up onion, various peppers and red pepper spice to the pot and simmer for another hour.


Then add in the rest of the ingredients: the oil, basil, oregano, salt, garlic salt and sugar. Simmer for another hour, then add two 15 oz. cans of tomato paste. Cool and freeze.